Teaching embryology to undergraduates
Posted by Shelley Edmunds, on 18 June 2010
I am employed as a graduate teaching assistant for a first year biomedical sciences course at Auckland University in New Zealand. The class is called Cellular and Developmental Biology and my job is to help with tutoring the laboratory classes. For my lab streams I’m the one who stands at the front and gives instructions, works with the demonstrators to assist and instruct the students, then grades the assignments afterwards.
With the word ‘developmental’ in the title, as you can imagine, there are lectures about embryology as part of the course. As the aim of the lab section is to support and extend what is taught within the lectures we naturally include an embryology class too. During the three hour session each student constructs a three dimensional model of a human four week old embryo (“today we’re making babies!”). Details are given here on the Auckland Uni website and the instructions are copyright to Colin Quilter 2003.
Each embryo is made of modelling clay called Du Kit and are baked before being returned to the students, giving everyone something to take home and keep. Teaching the class is a lot easier when you’ve been through it before so all demonstrators and tutors are given a modelling clay kit and the instructions then sent home to have a go. Here is the clay sitting on my dining room table ready for me to start.
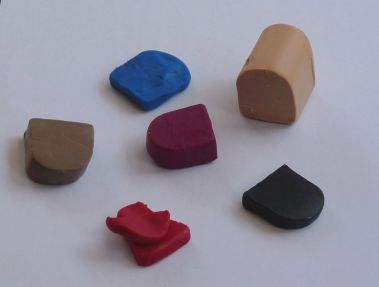
The clay comes in different colours so that each germ layer or type of blood vessel can be colour coded. Normally we’d use dissecting instruments to help with the modelling but I don’t have a dissection kit at home so I raided the kitchen drawers.
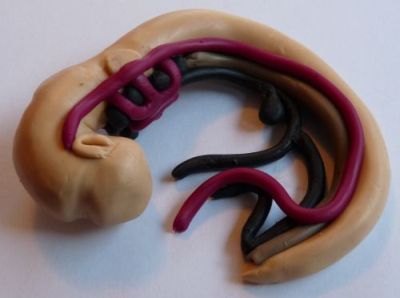
The first section to make, and one of the hardest, was the neural tube. It takes a bit of playing for the clay to warm up and also I was still getting the hang of how to work it at this point. The instructions are to scale at this point so the best method is to lay the clay on the page to see if it matches, but it’s easy to make the embryo flat on one side while doing this whereas an embryo should, of course, be rounded and somewhat smooth.
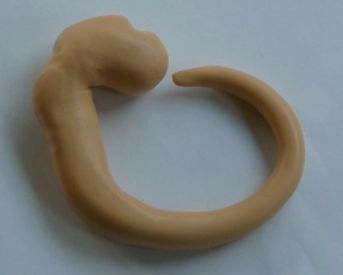
Then the notocord and gut sections are attached, giving the main internal structure of the model. It’s kind of cool how putting on the auditory and optic vesicles make it look more like a human.
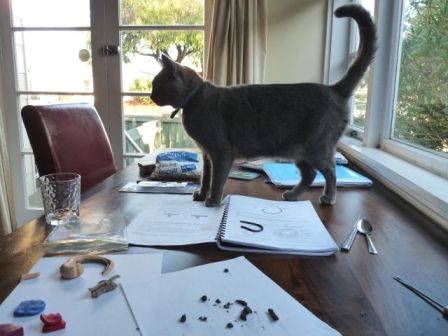
At this point I discovered that my home has a hazard we don’t usually face in the lab:
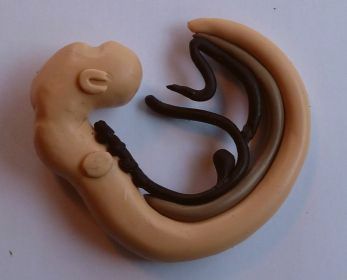
After shutting the cat out of the room I started putting on blood vessels. The colour coding really helps here, purple for mixed blood, red for oxygenated and blue for deoxygenated. The next picture has the aortic arches and other arteries attached.
Since the embryo is getting oxygen from the mother rather than the lungs the blood flow is different to what I’m used to having studied mainly adult physiology. I found this all a bit confusing at first but being able to trace the different vessels with their colour coding to and from the heart to the various other places they go really helped clarify what was happening. I would never have figured this out so well from just pictures, there’s something about physically laying the tubes down in the right place that sticks it into my brain.
Then I just needed to add somites along the back and the mesonephros and trigeminal ganglion. An actual embryo will have 43 somite pairs but we accepted any number as long as they were correctly paired and positioned and the sizes were appropriate. Mine has 14 pairs.
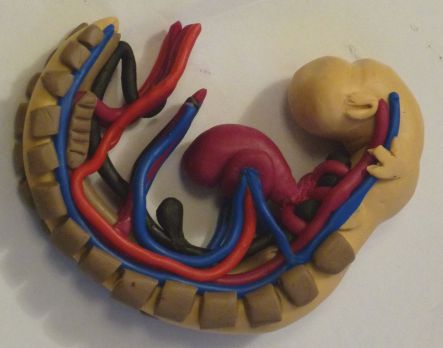
So there’s the end product, a beautiful four week old embryo. There are a few tissue types missing from this model to make it easier to see what’s going on, so it’s not technically a complete embryo. However after looking at the marking schedule and checking everything over I think I’ve done a good job, I’d give myself ten out of ten for this effort.
The students on the whole do seem to enjoy this lab, particularly when they get the finished product back at the end. And I was actually surprised at how much I learnt about how everything fits together and what turns into what after both making my version and teaching it to the students, so I think it’s an effective method for teaching this stage of human development.
 (18 votes)
7 thoughts on “Teaching embryology to undergraduates”
Leave a Reply
Get involved
Create an account or log in to post your story on the Node.
Sign up for emails
Subscribe to our mailing lists.
Thanks for showing this teaching tool. Hopefully it inspires someone to set up a similar project in an undergraduate course. I think this could easily be adapted to other organisms as well, or perhaps just a single organ, or even one cell.
The cool thing is the instructions are freely available at the link in my post for non-profit educational use, so it can easily be used by other groups to teach their students.
Some of my friends did the course back as undergrads and all still have their embryo models hanging around, it’s definitely popular.
Nice, Shelley! Do you think there are ways of improving on this, without loosing the basic take home bottom line?
Hi Fabiana! Actually I think it’s pretty good as it is. Most students only just finish in the three hours so you couldn’t make it any more complicated, but at the same time it’s good to be challenging. And many of the students talked with us about the blood vessels, moving the clay around to work out where things go so I think they’re getting similar things out of it that I was. Also the prelab questions made it pretty obvious who really read the lecture guide and who just followed the instructions, heh.
Thanks for sharing, Shelley. I’m definitely going to check out your link and try to make my own model. Plus, you’ve given me an idea for how to connect with the high school students who visit our lab — this could easily be adapted to our favorite model organism (zebrafish).
Also, Sometimes I forget about how useful modelling clay can be, even for us scientists when thinking about cell and tissue morphogenesis.
So which are the tissues missing?? It doesn’t say in a book.
I am excited to try this with my undergraduate students, but the link to the activity details only took me to the course outline. Can you share the link?
Best,
Victoria